What Is iPerf3? A Complete Guide to Network Speed Testing
Learn what iPerf3 is and how to use it for accurate network speed testing. This guide covers installation on Linux and understanding iPerf3 commands.
TUTORIAL


What Is iPerf3? A Complete Guide to Network Speed Testing
If you've ever been annoyed at slow network speeds or are just curious to know the performance of your internet connection, you've likely encountered some tools to identify the issue. iperf3 speed test is one of those robust, open-source tools used to measure the maximum achievable bandwidth on IP networks. For network admins and tech enthusiasts, being familiar with and utilizing iperf3 can be a game-changer when troubleshooting and maximizing network performance.
What is iperf3?
Essentially, iperf3 is a tool to enable active measurements of the highest achievable bandwidth on IP networks. It supports adjustment of various parameters related to timing, buffers, and protocols (TCP, UDP, SCTP with IPv4 and IPv6). It gives bandwidth, loss, and other pertinent measurements for each test executed. It's worth mentioning that iperf3 is a new version that doesn't share code with the original iperf and isn't backward compatible. Originally developed by NLANR/DAST, iperf3 is currently developed by ESnet/Lawrence Berkeley National Laboratory and is released under a three-clause BSD license.
Why Use iperf3?
In a world where streaming, gaming, and remote work are the new normal, it's more important than ever to have a stable and speedy network connection. iperf3 allows users to:
Measure Bandwidth: Determine the maximum possible data transfer rate between two nodes.
Detect Bottlenecks: Find the places in the network where things are slowing down.
Verify QoS (Quality of Service): Ensure the network is meeting some application performance standards.
How to Install and Run iPerf3 on Ubuntu 24.04:
If you're on Ubuntu and want to test your internet connection speed more precisely than most browser applications, iPerf3 is the tool for you. Here's how you go about it:
Step 1: Installing iPerf3

That's all you need to install it. Ubuntu has iperf3 in its default repositories, so the installation is very straightforward. Once it’s done, you can verify it’s installed by running:
Step 2: Understanding the Basic Command
Now, let's say you want to test your connection to the server at ping.online.net, which supports connections on ports from 5200 to 5209, and allows both TCP and UDP tests.
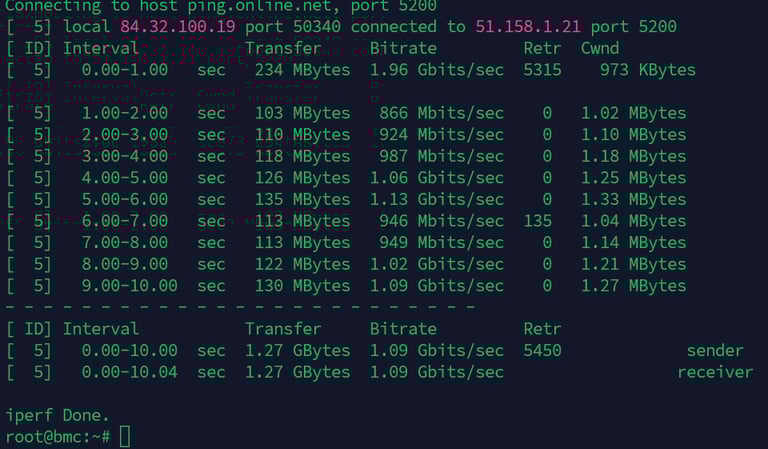
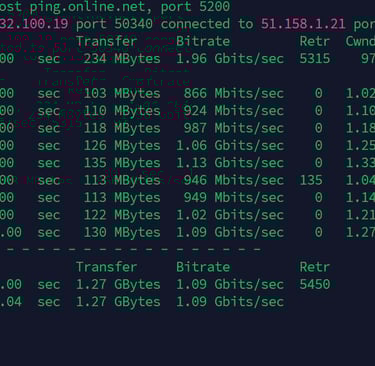
A basic TCP test looks like this:
-c stands for client, telling iperf3 to connect to the remote server
-p specifies the port
TCP test tries to send as much data as possible, as fast as the connection allows. Automatically use the full available bandwidth.
A basic UDP test looks like this:
UDP tests will use 1 Mbit/sec by default unless you specify a UDP with -u and bandwidth with -b.
If you’re on a modern home internet connection (say, 100–1000 Mbps) or testing a data center server, 1 Mbps is way too low. You'll probably see 0% packet loss, but that doesn't really tell you much about the actual quality of your connection at higher speeds. Let's try push 1Gbps link:
For example:
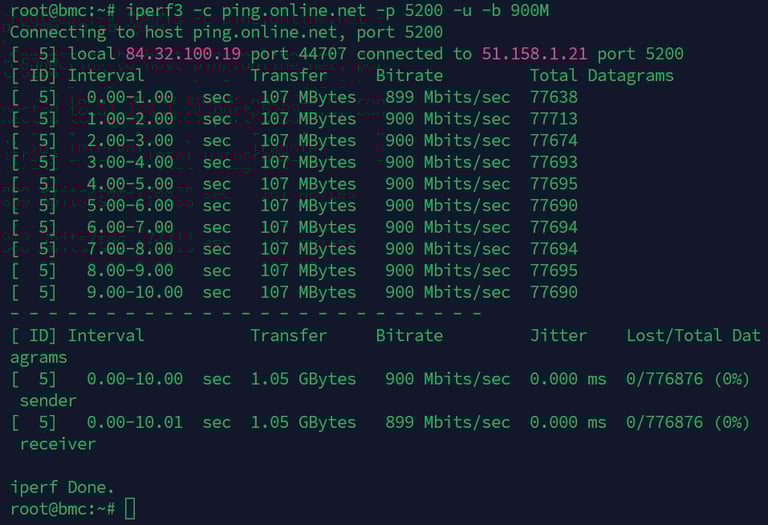
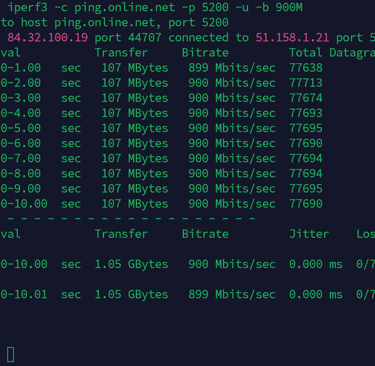
(Important note: -b 900M is only used with UDP. This don't work without UDP mark -u)
What's the difference between TCP and UDP:
TCP (Transmission Control Protocol) and UDP (User Datagram Protocol) are two fundamental transport protocols used in IP networking, each serving different purposes based on reliability and performance needs. TCP is connection-oriented, meaning it establishes a session between sender and receiver before transmitting data. It ensures reliable delivery through acknowledgements, retransmissions, and congestion control mechanisms, making it ideal for applications where data integrity and order are critical, such as web browsing, file transfers, and email.
UDP, on the other hand, is connectionless and does not guarantee delivery, order, or error correction. It sends packets independently without establishing a persistent connection, which allows for lower latency and reduced overhead. This makes UDP better suited for time-sensitive applications like video streaming, VoIP, gaming, and real-time monitoring, where speed is prioritized over perfect reliability. While TCP maximizes accuracy, UDP maximizes efficiency, and the choice between them depends on the specific requirements of the application.
Useful command adjustments:
-f b → bits per second
-f B → bytes per second
-f k → kilobits per second
-f K → kilobytes per second
-f m → megabits per second
-f M → megabytes per second
-f g → gigabits per second
-f G → gigabytes per second
Use -t to change test duration (default is 10 seconds), e.g. -t 20 for 20 seconds.
Add -P 5 if you want to test with multiple parallel streams.
In real-world usage, most applications don’t rely on just one connection. Web browsers, video apps, and games often use multiple concurrent TCP connections, so using -P gives a more realistic view of what your connection can actually deliver.
Also, on high-speed or long-distance links (like WANs or fiber), a single TCP stream may not ramp up fast enough due to congestion control. Multiple streams fill the pipe more effectively.
(-P only works with TCP, not UDP)
You can find iperf3 servers here:
https://iperf.fr/iperf-servers.php
https://github.com/R0GGER/public-iperf3-servers
The iPerf3 command might initially seem complex, but it's quite simple once you get the hang of it. For your convenience, feel free to try our free online iPerf3 Speed Test Command Generator – it builds the perfect command for you in seconds:
iPerf3 Speed Test Command Generator
You may also like: