Step-by-Step Guide: Installing a GUI on Ubuntu 24 Server for Beginners
In this guide, we’ll break down how to set up a GUI on Ubuntu 24.04 server in a way that’s simple to follow and understand.
TUTORIAL

Step-by-Step Guide: Installing a GUI on Ubuntu 24 Server for Beginners
Running a Linux System is great for performance and reliability, but working without a GUI can feel a bit intimidating, especially if you’re not super comfortable with command-line tools.
Installing a GUI can make your server easier to manage, whether you’re looking to run desktop apps or just want a visual way to keep track of everything. In this guide, we’ll break down how to set up a GUI on Ubuntu 24.04 server in a way that’s simple to follow and understand.
Step 1: Update Your Ubuntu 24.04 System
First things first, make sure your server is fully up-to-date. This step ensures you’re starting with the latest patches and updates, giving you a stable base to install the GUI.
Step 2: Installing GNOME
For a complete Ubuntu Desktop experience, you can install the GNOME desktop environment along with its default suite of applications. As a result, this setup can be resource intensive.
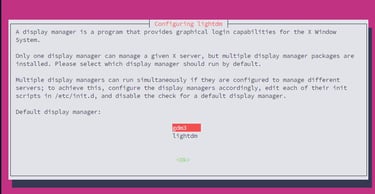
Step 3: Install LightDM (Display Manager)
A display manager starts and manages the desktop environment. LightDM is a lightweight solution, intended to use minimal server resources. If your server is powerful enough, you can choose the default GDM display manager in a later step. To install LightDM, use the following command:

Step 4: Set GUI as Default boot
To boot directly into the GUI after server reboot, you should change the default system target to graphical.target. This will include loading the graphical environment, comprising the display manager and desktop environment.
If you need to switch back to the command-line interface (CLI) as the default, you can run:
Step 5: Reboot the server
Reboot the server and verify that the graphical target is set as the default:
Output should be: graphical.target
Step 6: Connect to the GUI
Now that the desktop environment is installed, it's time to access it. If you manage the server remotely, you can simply access it through your hosting provider's control panel like KVM or Web Console.
FAQs about Installing GUI on Ubuntu Server
1. What is the best GUI for Ubuntu server?
The best GUI depends on your needs. GNOME provides a full Ubuntu desktop experience, KDE is customizable, and XFCE is lightweight, making it ideal for low-resource systems.
2. Does installing a GUI on Ubuntu server affect performance?
Yes, an installation of a GUI consumes more system resources such as RAM and CPU. If performance is crucial, then consider lightweight GUIs like XFCE or install only necessary graphical tools.
3. Is It Safe to Run a GUI on a Production Server?
Using a GUI on a production server increases the attack surface. For critical systems, stay with the command-line interface to reduce possible vulnerabilities.
4. Can I have multiple GUIs installed on one Ubuntu server?
Yes, you can install multiple GUI environments, such as Gnome, KDE, or Xfce, on the same Ubuntu Server. You'll be able to select which GUI to access at the log-in screen. However, it takes more disk and system resources, too.
5. What's the minimum CPU requirement for GUI to be installed over Ubuntu Server?
CPU: 2 cores, 2 GHz
RAM: 2 GB RAM
Free space: 25 GB
You can find the desired CPU model or dedicated server hosting provider using our FILTERING SYSTEM with exclusive discount codes.
You may also be interested in other Linux tutorials:
How to Create a Simple VPN Server?
Make Your Terminal Fun: Adding Custom Emojis to Your Root Prompt
Tutorial: How to Create RAID Arrays on Ubuntu 24 Using mdadm: RAID 0, RAID 1, RAID 5, and RAID 10
Tutorial: Replacing a Faulty Disk in a RAID 1 Array (mdadm on Ubuntu 24.04)
7950X CPU Testing: Sysbench Setup, Performance Results & Analysis on Linux
