Tutorial: How to Create RAID Arrays on Ubuntu 24 Using mdadm: RAID 0, RAID 1, RAID 5, and RAID 10
RAID arrays optimize how data is stored on multiple drives, balancing storage capacity, performance, and redundancy depending on the RAID level selected. While some configurations focus on maximizing storage and speed (e.g., RAID 0), others prioritize data protection through redundancy (e.g., RAID 1, RAID 10).
TUTORIAL


Tutorial: How to Create RAID Arrays on Ubuntu 24 Using mdadm: RAID 0, RAID 1, RAID 5, and RAID 10
If you want to improve your system’s performance, redundancy, or both, implementing a RAID (Redundant Array of Independent Disks) is an important step. This tutorial will walk you through the process of creating RAID configurations (RAID 0, RAID 1, RAID 5, and RAID 10) using the mdadm tool on a Ubuntu 24.04 64Bit Linux system.
What is RAID and Why Do We Use It?
RAID arrays optimize how data is stored on multiple drives, balancing storage capacity, performance, and redundancy depending on the RAID level selected. While some configurations focus on maximizing storage and speed (e.g., RAID 0), others prioritize data protection through redundancy (e.g., RAID 1, RAID 10). Unique features of RAID type, each with trade-offs to select the best configuration for your specific needs, are Important.
For example, you have two disks, each with a 2TB SSD. You can make it 2x 2TB SSD RAID1 with available storage space of 2TB SSD. Because two hard disks are mirroring, and if one of the disks gets damaged, your server will keep working with safe data. In other words, fault tolerance -1 disk.
Please check RAID calculator for better comparison:
How to Install RAID1 on Ubuntu 24: Step-by-Step Instructions
Step 1: Prepare your hard disks
The first step is to identify the drives associated with your system and determine which ones are available for a RAID array. This ensures that the drives are unmounted and not part of the existing RAID configuration.
Use the “lsblk” command to list all block devices.
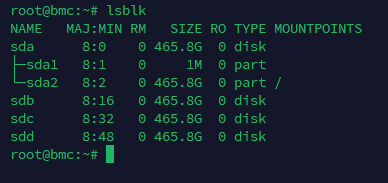

We can see that server has 4 disks: sda (OS); sdb; sdc; sdd
Step 2: Create RAID from your hard disks: (Warning: RAID configuration may cause data loss)
Please check commands below for desired RAID arrays:
Step 3: Checking your existing RAID configuration.
Use the following command to see if drives are included in a RAID array.


We can see that RAID1 has been created from disk sdb and sdc.
15% synced, and the remaining time is 33 minutes.
Step 4: Save RAID so it will remain after system reboot

Update initramfs to update RAM filesystem and include new RAID configuration:

And finally, assemble RAID on system startups:
Step 5: Mount the RAID1 array
Create a directory RAID1 for the mount point
Create a Filesystem on /dev/md1:
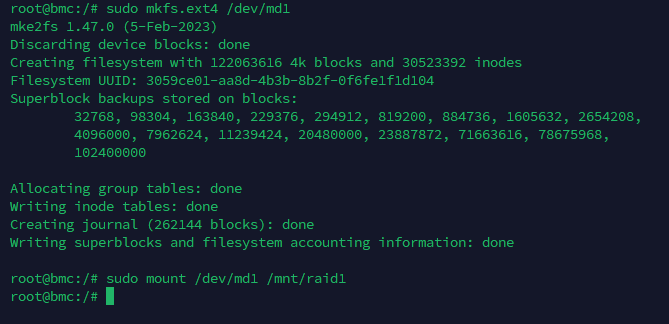

Verify that it's mounted:
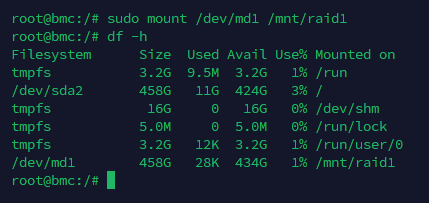

/dev/md1 458G 28K 434G 1% /mnt/raid1
(indicates that it's mounted)
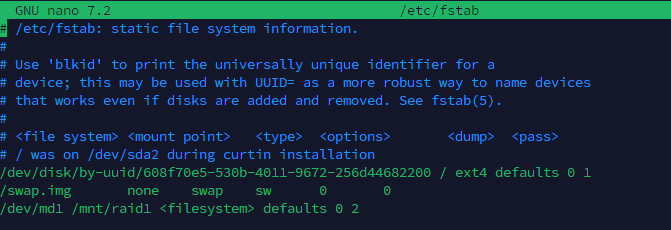
Step 6: Edit the fstab file:
You must open a file editor with the command below:
At the end of the file, please add the text:
/dev/md1 /mnt/raid1 <filesystem> defaults 0 2
1) Press Ctrl + X to exit.
2) Press Y to confirm you want to save the changes.
3) Press Enter to finalize the save.

Step 7: Verify your RAID1 is active.
Reboot the server and enter the command below to check the RAID1 status:
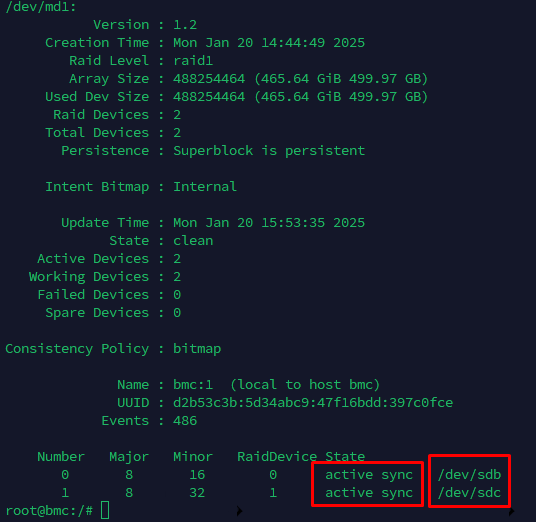

Summary:
By following this guide, you can efficiently create and manage RAID arrays on your Linux system, increasing performance and data redundancy. In this example, you have configured a new RAID1 array with two drives.

